Bambu Lab DIY RGB LED Light Kit 001
Official Store Deal
Expert Analysis Overview
Illuminating the 3D Printing Workspace: A STEM Educator's Perspective
The Bambu Lab DIY RGB LED Light Kit 001 is a versatile lighting solution designed for 3D printing enthusiasts and educators, offering customizable illumination for the printing environment. This kit provides the essential hardware to integrate dynamic, multi-color lighting into a 3D printed enclosure or fixture, emphasizing a hands-on learning experience. It is an excellent tool for demonstrating basic electronics and the practical application of 3D printing in creating functional objects.
Unlike generic lighting solutions that offer limited customization, this kit empowers users to design and print their own lampshades or housing. This approach transforms a simple lighting upgrade into a comprehensive STEM project. Students can explore CAD design, material properties, and basic electrical connections. The kit promotes active engagement with technology, moving beyond passive consumption to active creation.
From a STEM education standpoint, the kit serves as a practical module. It allows for the exploration of light properties, color mixing, and the principles of LED technology. The inclusion of a remote control further enhances its educational value, enabling experimentation with different lighting effects and their impact on visibility or aesthetic outcomes. This kit is more than just a light; it's a learning platform.
Core Components and Their Educational Value
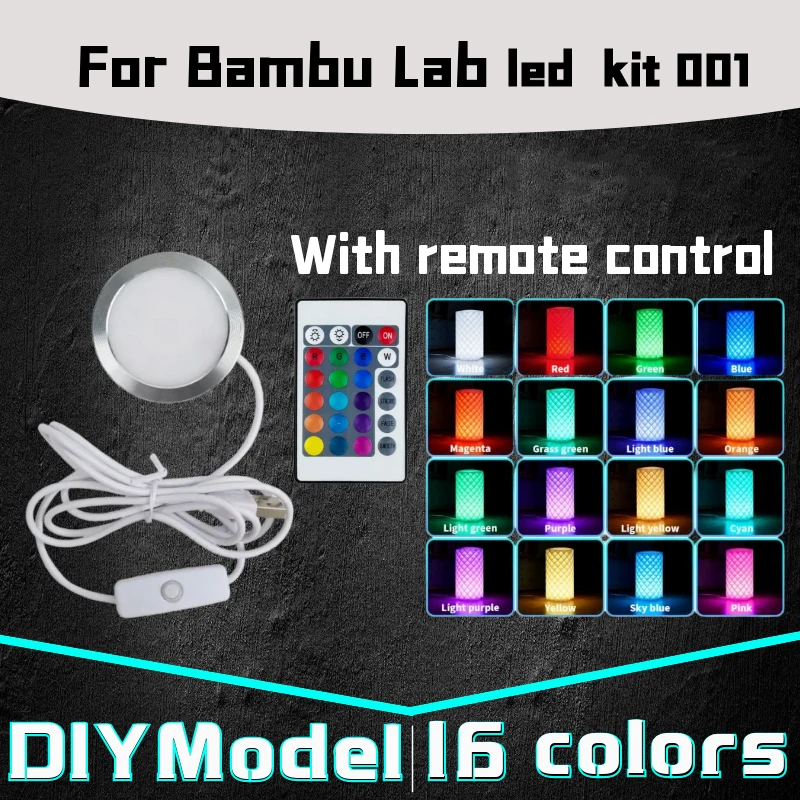
The kit prominently features an aluminum alloy model lamp, which houses the LED array. This component is the heart of the lighting system. Its robust construction suggests durability, an important consideration for repeated use in educational settings.
This central light panel connects via a USB power plug, making it compatible with widely available power sources like computer ports, power banks, or standard USB wall adapters. This universal power solution simplifies integration. The ease of powering the unit reduces setup complexity, allowing more focus on the design and assembly aspects.
An adjustable power switch is integrated into the USB line. This in-line switch provides immediate control over the light's operation. Simple functionality is key for quick demonstrations. The switch offers a tactile interface for on/off control, enhancing user interaction.
Crucially, the kit includes a 3M VHB adhesive pad. This strong adhesive facilitates secure mounting of the light panel within a custom-designed 3D printed enclosure. Proper adhesion ensures stability. The adhesive simplifies the final assembly step, providing a reliable bond.
Finally, a remote control is provided for comprehensive color and mode adjustments. This remote offers 16 distinct color options and various lighting effects. The ability to change colors remotely adds significant flexibility. Students can instantly observe the impact of different light temperatures and hues on their printed objects.
Assembly Process for Young Innovators
The assembly of this LED light kit is designed to be straightforward, making it highly suitable for educational environments. The process begins by threading the USB line from top to bottom through the user-printed lampshade or housing. This initial step establishes the cable management. Proper routing prevents tangles and ensures a clean finish.
Next, the light panel presses into place within the housing. This step typically involves a snug fit, indicating a design that prioritizes stability. A secure fit is vital for long-term use. This mechanical integration teaches students about tolerances and functional design.
Following this, the trunking presses into the main unit. This secures the wiring and provides structural integrity. The trunking protects internal connections. It reinforces the overall robustness of the assembly.
The final step involves rotating the components until a 'snap' sound is heard. This audible feedback confirms that the parts are correctly locked together. Positive feedback is crucial for confidence. This simple mechanism ensures a secure and stable final product.
This step-by-step approach simplifies the construction, allowing students to focus on the principles of assembly rather than complex wiring. It reinforces the idea that functional electronics can be built with basic components and careful execution. The modular nature of the kit makes troubleshooting easier, as each component can be checked individually if issues arise.
Expanding Creative Horizons with Customizable Shades
The most compelling aspect of this kit for a STEM educator is its DIY lampshade capability. The kit provides the lighting hardware, but the aesthetic and functional housing is left to the user's creativity. This encourages a project-based learning approach. Students are challenged to design, print, and integrate their own custom light diffusers.
This open-ended design task allows for exploration of various design principles, including light diffusion, thermal management, and structural integrity. Different lampshade geometries can be tested for their impact on light distribution. For instance, a student might experiment with a pineapple-textured shade for ambient light versus a more focused design. The possibilities are vast.
Furthermore, the ability to print multiple lampshade models with the same core components introduces concepts of iteration and optimization. Students can refine their designs based on performance and aesthetics. This iterative process is fundamental to engineering and product development. It teaches valuable lessons in problem-solving and continuous improvement.
Imagine a classroom where students design shades to optimize light for specific tasks, such as inspecting print layers or illuminating a webcam for time-lapse videos. This hands-on application makes abstract design concepts tangible. The kit transforms a simple lighting upgrade into a comprehensive design challenge, fostering innovation and practical skills.
The Spectrum of Illumination: Color and Control
The 16-color RGB LED functionality provides a rich palette for various applications. Beyond simple white light, the ability to select specific hues can be incredibly useful. Different colors can highlight specific features of a 3D print. For example, a cool blue light might emphasize intricate details, while a warm yellow light creates a comfortable working atmosphere.
The included remote control offers intuitive access to these color options and various lighting modes. This ease of control is a significant advantage over manual adjustments. Users can quickly cycle through colors or adjust brightness without physically interacting with the light unit. This remote functionality is particularly useful when the light is integrated into a less accessible enclosure.
For educational purposes, the remote allows for dynamic demonstrations of color theory and light interaction. Students can observe how different colored lights affect the appearance of various printed materials. This practical experimentation reinforces theoretical knowledge. The remote makes the kit user-friendly for all skill levels.
Consider a scenario where a student is printing a multi-color object. They can use the RGB light to match or contrast the print's colors, enhancing visual inspection or creating a specific ambiance. The versatility of the lighting system extends its utility far beyond basic illumination, making it a valuable asset for both practical work and creative expression.
Safety and Practical Considerations for the Classroom
When introducing electronic components into a learning environment, safety is paramount. This kit's reliance on USB power is a significant advantage, as USB operates at a low voltage (typically 5V DC). This inherently reduces the risk of electrical shock compared to mains-powered devices. Low voltage systems are generally safer.
The simple assembly steps also contribute to a safer experience. With clear instructions and minimal complex wiring, the chances of incorrect assembly leading to hazards are reduced. The kit's design focuses on straightforward mechanical connections. This minimizes potential points of failure.
However, it is crucial to emphasize proper handling of electronic components and adherence to assembly instructions. While the kit itself is low-risk, educators should still guide students on best practices for working with electronics. Supervision is always recommended. Ensuring a tidy workspace also prevents accidents.
This kit offers an excellent opportunity to teach responsible technology use. Discussions around power consumption, component lifespan, and basic electrical safety can be integrated into the project. The practical nature of the kit makes these lessons more engaging and memorable for students. It's a safe and effective way to introduce electronics.
Long-Term Value and Educational Impact
The Bambu Lab DIY RGB LED Light Kit 001 represents a strong long-term value, especially within an educational context. Its low price point makes it accessible for multiple student projects or classroom sets. The durability implied by its aluminum alloy construction suggests it will withstand repeated use.
Unlike single-purpose gadgets, this kit offers ongoing educational opportunities. It can be reused with different lampshade designs, allowing for continuous learning and creative exploration. The core components remain useful even as design ideas evolve. This adaptability extends its lifespan and educational return on investment.
For educators, the kit simplifies the integration of electronics and 3D printing into the curriculum. It provides a tangible, engaging project that combines design, fabrication, and basic electrical engineering. The clear instructions and robust components minimize frustration, ensuring a positive learning experience. This kit empowers students to become creators.
Imagine students proudly showcasing their custom-designed and illuminated 3D prints, explaining the design choices and the electronic principles behind them. The kit fosters a sense of accomplishment and encourages further exploration in STEM fields. It makes complex concepts approachable and fun. This is an investment in future innovators.